Work safely by storing all your transcriptions in a Git repository
This is the third part of the “TEI Editor’s ‘Hello, World’ Exercise.” If you are doing the ‘Hello, World’ exercise, it’s essential that you have completed the previous two posts. This post can also be read as a standalone post that introduces you to Git and helps you set up GitHub Desktop.
What’s Git and why do it need it?
Let’s start with a fundamental truth: your transcriptions are important. They’re the product of a significant amount of your time and energy. The last thing you want is for something to happen to them. Unfortunately, accidents happen. Files are accidentally deleted. Hard drives die. Faulty search and replaces can muck them up. The likelihood of accidents increases when you’re working as part of a team. At some point, someone will work on the wrong version of a file or two people will edit different copies of the same transcription. Git provides a safety net so you don’t have to worry about these things.
Git is the most widely-used version control system (VCS) in the world. The purpose of a VCS is to track all the changes made to a project’s computer code. Programmers everywhere use them because they solve problems that routinely come up in programming projects. For example, they allow you to:
- backup your data to a remote server.
- undo any change ever made to your files.
- work collaboratively with others by ensuring that everyone is working off the latest versions of the files.
- resolve conflicts (usually automatically) when two people edit the same file at the same time.
- view a log of all the changes made in the repository and see the differences between any two of them. This makes it easy to review the changes made by another editor or to double-check your own work before committing it into the repo.
This just scratches the surface of what you can do. Once you’ve used a VCS for a while, you’ll wonder how you ever managed without it. They allow you to work more confidently and productively, sound in the knowledge that your work is safe.
So, let’s get down to business and set up Git so you can start using it.
1. Create a Github account.
If you don’t already have one, create a GitHub account. Be sure to use your academic email address (if you have one) since it will enable you to apply for their free education pack for students or their toolbox for academic staff/researchers. This gives you a free upgrade to a GitHub Pro account with a lot of other extras. You don’t need these extras to do this exercise, or even to use GitHub, but it’s nice to have them.
2. Enable Email address privacy.
After creating your GitHub account, you need to change some settings. The way you get there will vary on the size of your browser window. If you see an icon on the top left of the screen, follow the instructions in the labelled paragraph ‘A’. Otherwise, continue to paragraph ‘B’.
A. Click on the icon and select your name in the dropdown menu. Then, click on the big graphic next to your name. It may say ‘change your avatar’ when you hover over it, but clicking on it takes you the Settings page.
B. Click on your user icon in the upper right of the window and select Settings in the dropdown menu.
In the Settings page, click on Email and ensure that the following two items are checked:
- Keep my email addresses private
- Block command line pushes that expose my email1
In the grey text underneath keep my email address private, you’ll see a GitHub created dummy email address. Keep this email address handy. You’ll need it when configuring GitHub Desktop. This dummy email address isn’t actually an email address that you can use. It’s what you can enter into Git so that your real email address isn’t exposed in your Git log.
Click Save email preferences.
3. Create your first GitHub repository
Click on your user icon in the upper right of the window again and select Your repositories in the dropdown menu. This takes you to a page listing all the repositories that you have created. Unless you’ve used GitHub before, the list will be empty.
Click on the green New button to create a new repository. This opens a page where you can enter its details.
- Type in ‘pointybrackets-exercises’ for the Repository name. GitHub will check whether you have already created a repository with this name. If it tells you the name is unavailable, that means that you already have a repository with the same name.
- Although Description is optional, it’s still useful to enter something. For this exercise, I entered the description ‘My textsandpointyprackets.com exercises.’
- Select Private so that the repository is only accessible to you (or anyone you specifically invite). Public repositories are available to anyone.
- Ensure ‘Initialize this repository with a README’ is selected. This will make GitHub create a small README.md file when it creates your repository. It’s useful to put any introductory or instructional text necessary in this file.
- Don’t worry about adding a .gitignore or Licence.
- Click Create repository.
Github will then create your repository and take you back to the Your Repositories page.
Let’s start using it.
4. Configure GitHub Desktop.
To use your repository, you need to have a Git client installed on your computer. I recommend using GitHub Desktop, a free, fully-featured programme from GitHub. Although GitHub Desktop was designed to integrate nicely with GitHub, it will work on any Git repository that you have, regardless of where it might be hosted.2
Download GitHub Desktop and install it on your computer.
- On Macintosh, double click the downloaded zip file. Once it has expanded, drag the GitHub Desktop icon into the Applications folder.
- On Windows, double click the downloaded GitHub Desktop file and click install.
After installing GitHub, launch it. In GitHub Desktop, click on Sign in to GitHub. Enter the email address you used when creating your account and password.3
GitHub Desktop will then ask you to confirm the name and email address that will appear in the log of all your activity. Enter the dummy noreply email address that GitHub recommended earlier. After confirming these values, click Continue.
It will then ask if you want to submit usage stats to GitHub. Choose the option you want and then click Finish.
Now it’s time to get a copy of the repository onto your computer.
5. Clone your repository to your local hard drive
In GitHub Desktop, click on Clone a repository from the internet to see a list of all the repositories associated with your GitHub account. Click on the one you created earlier to select it. Then, click on Choose and decide where you want to put this repository on your computer.
Think carefully about what you want to call this folder and where you want it to be. You can’t move it around or rename it later without breaking Git’s access to it.4
When cloning a repository, always create a new folder to hold it and ensure that this folder is NOT placed inside an already cloned repository.
If you expect to have more than one repository in a project, it would likely be a good idea to create a folder called ‘Repositories’ and then to create subfolders for each of the individual repositories.
Once you are satisfied with the folder name and its location, click Clone.
GitHub Desktop will now create a local version of the repository on your computer. Go and check it out.
6. Tweak your repository settings
Git will track all the files contained within your project directory. There are some files, however, that you won’t want to track. Your operating system is constantly creating and updating invisible preference files or previews. These files are usually hidden, so you likely aren’t even aware that they exist. Git knows they are there and it will track them unless you tell it otherwise. Tracking these files both clutters up your repository and increases the likelihood of conflicts if you are working as part of a team. It’s consequently considered best-practice to force Git to ignore these files.
Go to Repository > Repository Settings in GitHub Desktop and click on Ignored Files. A small pane should appear that is either empty or has the words ‘Ignored files’ in it. Paste in the following:
.DS_Store
.DS_Store?
._*
.Spotlight-V100
.Trashes
ehthumbs.db
Thumbs.db
Click Save.
This will great a file called .gitignore on your system. You likely won’t see this file if you use a Macintosh since it hides all files whose names start with a period.
You now need to commit this new file into your repo.
In GitHub Desktop, go to Repository and select Pull (if it’s not greyed out). This will pull any changes from the repository on GitHub onto your computer. Don’t worry if it’s greyed out. That means there are no new changes to pull from your repository on GitHub.
Then, click on Changes. You should see .gitignore with a green plus next to it. This indicates that it’s a new file. Ensure that the checkbox next to the right of the filename is selected. This tells Git that you want to include this file in your next commit.
In the main portion of the screen, you’ll see the changed content in the file. Text with a green background has been added; text with a red background deleted. Metadata indicating where the changed lines start and end have a pale blue blackground.
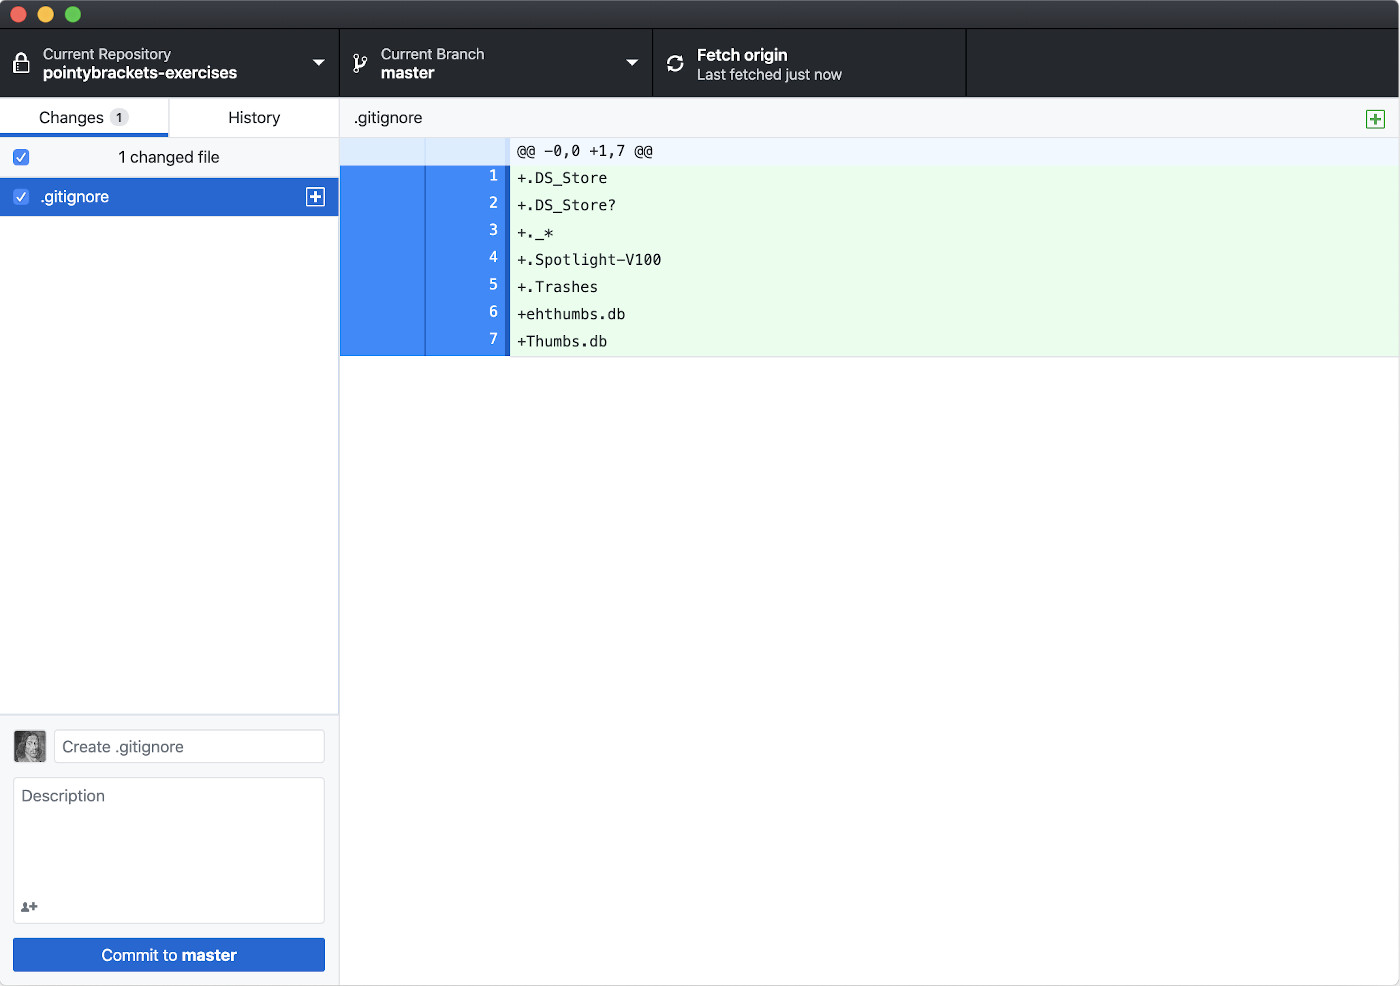
Committing your changes to .gitignore with GitHub Desktop
At the bottom left of the window, there’s a small field for you to enter a mandatory summary of the commit. It will likely already contain something like ‘Create .gitignore.’ If it doesn’t, enter a meaningful summary of your own into that line.
Press Commit to master to commit (or register) this change into the local copy of the repository on your hard drive. Then, go to Repository > Push to get it into your repository on GitHub. This push is essential. Firstly, it ensures that it’s backed up remotely. Secondly, this is also how you share your changes with others if you are working as part of a team.
You now have all the essential bits in place to actually create your first TEI document and say ‘Hello, World’ in TEI XML.’
-
These settings ensure that your email address will never be exposed either on the GitHub site or in cloned versions of the repositories you store there. It has no effect if you are creating and sharing repositories via another online service, like BitBucket. ↩
-
Atom Text Editor and oXygen XML Editor both include (or have optional) Git add-ons, but they aren’t fully-featured clients. If you find you like Git, some free clients, like SourceTree or the command line offer even more functionality. ↩
-
If you enabled Two-Factor Identification (2FA), you will later be asked for the time-sensitive six digit code sent to your selected device. ↩
-
Actually, you can move it around, but you’ll have to do a little bit of extra work reconfiguring GitHub Desktop. After moving the file, you first have to add the repository into GitHub Desktop again by selecting it via File > Add local repository. Then, you’ll have to delete the reference to the older location in GitHub Desktop by right clicking on it in the repositories list and selecting Remove. ↩